Custom Fields
Custom fields
If you're looking to add some extra data to your content in a more structured way, then you're in the right place! Outstatic has an awesome feature called custom fields that makes it super easy to do just that.
Field types
| Field type | Use it for | Saved value |
|---|---|---|
| String | Short, single-line text. | string |
| Text | Longer plain text. | string |
| Rich Text | Formatted text edited with the rich text editor. | string |
| Number | Numeric values. | number |
| Select | One value from a list of configured options. | The selected option's value as a string |
| Tags | Multiple labels or options. | An array of { label, value } objects |
| Boolean | True or false values. | boolean |
| Date | Date and time values. | Date value stored in frontmatter |
| Image | A selected media item. | Image path as a string |
| Object | A group of named sub-fields saved together. | Object keyed by sub-field ids |
| Array | A repeatable list of primitive values or objects. | Array of the selected item type |
Object and Array fields
Use an Object field when related values should be edited and saved together, such as SEO metadata, author details, or social sharing settings.
Use an Array field when editors need a repeatable list, such as authors, testimonials, links, FAQs, or gallery images. When you choose Array, pick an item type. Arrays can contain String, Text, Number, Boolean, Date, Image, or Object items.
Object fields and arrays with Object items let you define sub-fields. Sub-fields can be String, Text, Number, Boolean, Date, Image, Object, or Array. Sub-field names must be unique within the same parent object, and nested object-style fields can go up to three levels deep.
Steps to add custom fields:
Step 1: Access the Add Custom Fields Page

First, head over to the Collections page and click the pencil icon on the Collection you want to add custom fields to.
Step 2: Create a new Custom Field
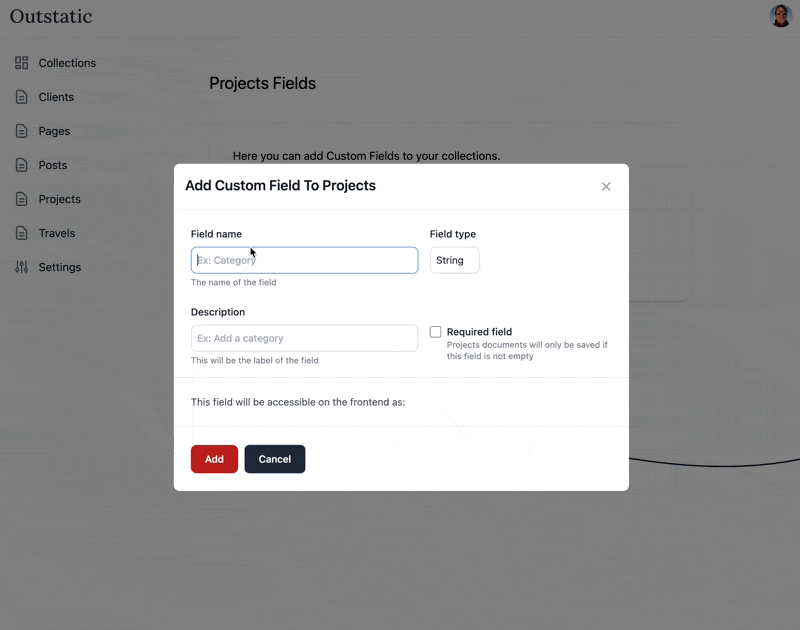
Once you've selected your Collection, click the Add Custom Field button. This will bring up a modal with a few options for you to fill out.
Field name: Enter the name of your custom field in the "Field name" section. This will be the name of the field that appears on your Document.
Field type: Choose the data type that you would like the custom field to be in the "Field Type" section. For example, you might choose "string".
For an Array field, choose the item type for each entry in the list. If the item type is Object, define the sub-fields that each array item should contain.
For an Object field, define the sub-fields that belong inside the object.
Description: You can add a brief description of the field in the "Description" field. This is a good place to provide context for the field and explain how it should be used.
Required field: If you want to make the custom field mandatory, select the "Required Field" checkbox. If someone tries to save a document without filling in this custom field, they will be prompted to enter data into this field before the document can be saved.
This field will be accessible on the frontend as: Outstatic will generate a camel case id based on the field name. This is how the field will be stored in your Markdown files and you should use this id to fetch data from the frontend. Check out the Fetching data section of the docs to learn more.
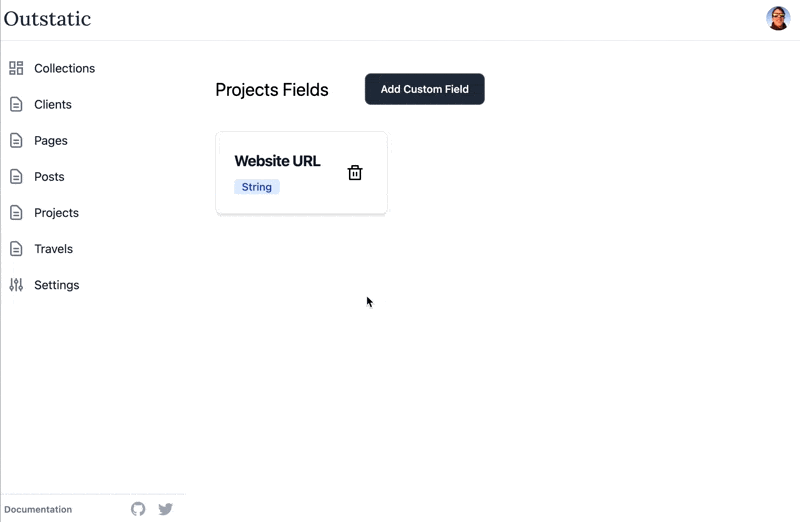
Step 5: Save the custom field Finally, save your new custom field by clicking the "Add" button in the custom fields interface. Once saved, the custom fields will be available for use on the selected collection documents.
Once saved a new field will appear in the Editor Settings:

Editing Custom Fields

Editing is limited to the Description and Required fields. To avoid conflicts with already saved data, you will not be able to edit the Field name or Field type.
You can change the field's label and if it is required.
If your editing a Tags field, you can also delete tags.
Just click on the field you want to edit, make your changes, and hit Edit.
Deleting Custom Fields
To delete a field, simply click the trash icon next to the field you want to remove.
Important: deleting a field does not remove the metadata from your Markdown files.
Fields only mode
Collections and singletons can also be configured to use Fields only mode.
This is useful when a content type should only be edited through structured fields, such as:
- landing page settings
- site-wide configuration
- author profiles
- content that is rendered from metadata instead of a long Markdown or MDX body
When Fields only mode is enabled, the edit page shows only the document settings panel. The title is shown as a regular text field in that panel, alongside status, date, slug, author, and any custom fields configured for the collection or singleton.
Enable Fields only mode for a collection
- Open the Outstatic dashboard.
- Go to Collections.
- Click the settings icon for the collection you want to configure.
- Below the Custom Fields section, find Editor.
- Check Fields only mode.
- Click Update.
After saving, documents in that collection will open in the settings-only editor.
Enable Fields only mode for a singleton
- Open the Outstatic dashboard.
- Go to Singletons.
- Open the settings page for the singleton.
- Below the Custom Fields section, find Editor.
- Check Fields only mode.
- Click Update.
After saving, that singleton will open in the settings-only editor.
The Update button is always visible, but it is disabled until you change the Fields only mode checkbox.
What gets saved
The setting is stored in the schema file for the collection or singleton.
For a collection, the schema file is stored at:
/outstatic/content/{collection}/schema.jsonFor a singleton, the schema file is stored at:
/outstatic/content/_singletons/{singleton}.schema.jsonExample:
{
  "title": "homepage",
  "type": "object",
  "settings": {
    "fieldsOnlyMode": true
  },
  "properties": {
    "heroTitle": {
      "required": true,
      "description": "Main heading on the home page",
      "fieldType": "String",
      "dataType": "string",
      "title": "Hero Title"
    }
  }
}
Good to know
Fetching Custom Fields
Custom fields will be unique to a collection, but metadata queries will operate across all collections (and should be narrowed by collection if you care about a specific collection's custom fields). To learn more about how to fetch collection specific data read the Fetching data section of the docs.
How are Custom Fields stored?
Fields are stored under /outstatic/content/{collection}/schema.json.
Example schema.json file:
{
  "title": "projects",
  "type": "object",
  "settings": {
    "fieldsOnlyMode": false
  },
  "properties": {
    "websiteUrl": {
      "required": false,
      "description": "website url",
      "fieldType": "String",
      "dataType": "string",
      "title": "website url"
    },
    "websiteSummary": {
      "required": false,
      "description": "Summary",
      "fieldType": "Text",
      "dataType": "string",
      "title": "website summary"
    },
    "seo": {
      "required": false,
      "description": "Search and sharing metadata",
      "fieldType": "Object",
      "dataType": "object",
      "title": "SEO",
      "fields": {
        "metaTitle": {
          "required": true,
          "fieldType": "String",
          "dataType": "string",
          "title": "Meta Title"
        },
        "social": {
          "fieldType": "Object",
          "dataType": "object",
          "title": "Social",
          "fields": {
            "image": {
              "fieldType": "Image",
              "dataType": "image",
              "title": "Image"
            }
          }
        }
      }
    },
    "authors": {
      "required": false,
      "description": "People credited on this project",
      "fieldType": "Array",
      "dataType": "array",
      "title": "Authors",
      "itemType": "Object",
      "fields": {
        "name": {
          "required": true,
          "fieldType": "String",
          "dataType": "string",
          "title": "Name"
        },
        "role": {
          "fieldType": "String",
          "dataType": "string",
          "title": "Role"
        }
      }
    }
  }
}
Object and Array fields are saved in Markdown frontmatter using the same field keys:
seo:
  metaTitle: Outstatic project
  social:
    image: /images/social.png
authors:
  - name: Ada Lovelace
    role: Writer
  - name: Grace Hopper
    role: Editor
Select fields are saved as the selected raw value:
category: newsConclusion
Overall, custom fields are an awesome way to extend your content with additional structured data. By following these steps, you'll be able to create custom fields and start using them in no time!